Search This Blog

Showing posts with label linux. Show all posts

Tuesday, April 18, 2023

How to change download policy of repositories in Red Hat Satellite 6.3?

Tested on Red Hat Satellite 6.3


Issue

How to change the download policy of all enabled repositories in Satellite 6.3?

How to change the repository download policy to immediate in Satellite 6.3?


Raw

- Changing download policy to 'immediate'.

foreman-rake katello:change_download_policy DOWNLOAD_POLICY=immediate


- Changing download policy to 'on-demand'.

foreman-rake katello:change_download_policy DOWNLOAD_POLICY=on_demand

Thursday, November 21, 2019

Get IPMI IP address from OS

 First check that you have ipmitool installed:

[root@lykan ~]# yum provides ipmitool Last metadata expiration check: 0:06:54 ago on Thu 21 Nov 2019 10:39:22 PM CST. ipmitool-1.8.18-10.fc29.x86_64 : Utility for IPMI control Repo : fedora Matched from: Provide : ipmitool = 1.8.18-10.fc29

Discover:

[root@lykan ~]# ipmitool lan print | grep "IP Address" IP Address Source : Static Address IP Address : 10.10.4.5

The complete information provided:

[root@lykan ~]# ipmitool lan print Set in Progress : Set Complete Auth Type Support : NONE MD2 MD5 PASSWORD Auth Type Enable : Callback : : User : : Operator : : Admin : : OEM : IP Address Source : Static Address IP Address : 10.10.4.5 Subnet Mask : 255.255.255.0 MAC Address : xx:xx:xx:xx:xx:xx SNMP Community String : public IP Header : TTL=0x40 Flags=0x00 Precedence=0x00 TOS=0x10 BMC ARP Control : ARP Responses Disabled, Gratuitous ARP Disabled Gratituous ARP Intrvl : 2.0 seconds Default Gateway IP : 10.10.4.254 Default Gateway MAC : 00:00:00:00:00:00 Backup Gateway IP : 0.0.0.0 Backup Gateway MAC : 00:00:00:00:00:00 802.1q VLAN ID : Disabled 802.1q VLAN Priority : 0 RMCP+ Cipher Suites : 0,1,2,3,4,5,6,7,8,9,10,11,12,13,14,128 Cipher Suite Priv Max : XXXaaaXXaaaXaaa : X=Cipher Suite Unused : c=CALLBACK : u=USER : o=OPERATOR : a=ADMIN : O=OEM Bad Password Threshold : Not Available

Tuesday, October 1, 2019

Improve user experience using QEMU/KVM with Windows guest

A lot of sysadmins, SRE o wherever you want to call us, using native Linux in our laptops have the need to use virtual machines running Windows (some support, pentesting tasks, etc), if you are passionate about running periodic updates by now you figure out the main problem of this, if not, you will; the main problem is that on every kernel upgrade, you will lose the modules of VMware or VirtualBox, the best solution for this is to use QEMU/KVM, the K is for kernel so the support is embedded in the kernel, with this you will never lose support on your virtual machines, but there is a catch, even if you install virtIO drivers you will face issues like the screen does not resize, copy and paste from host to guest does not work, and is very sad to work that way.

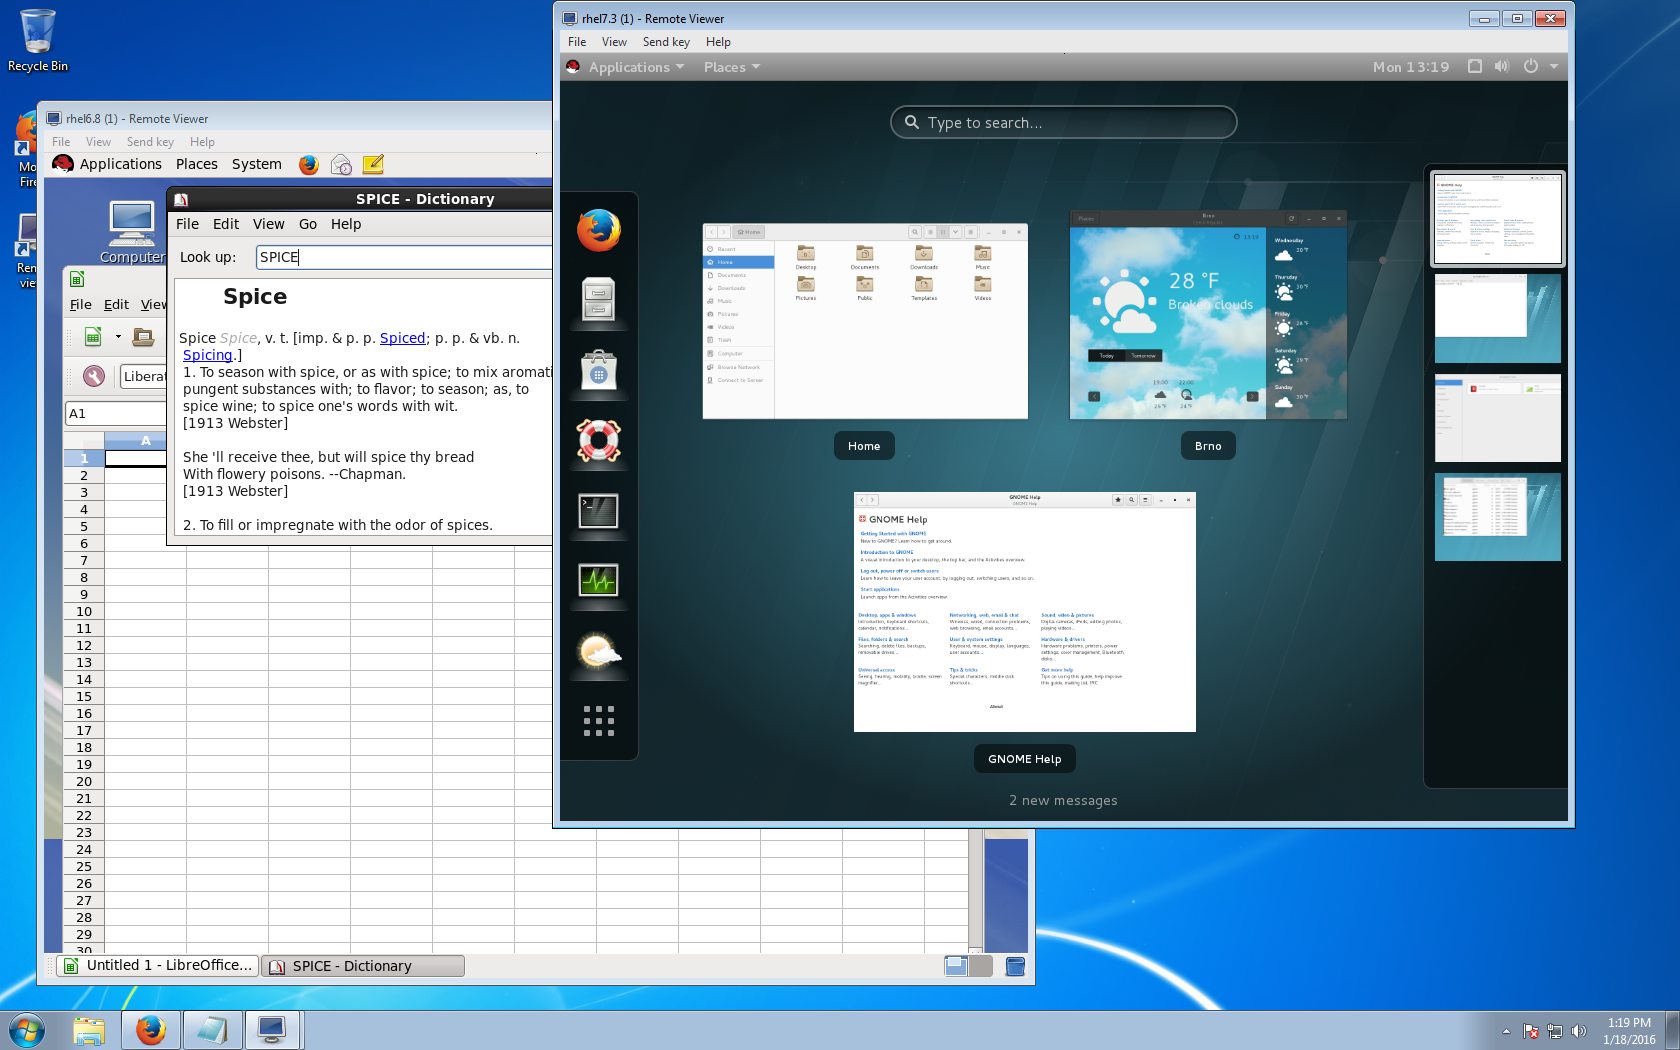
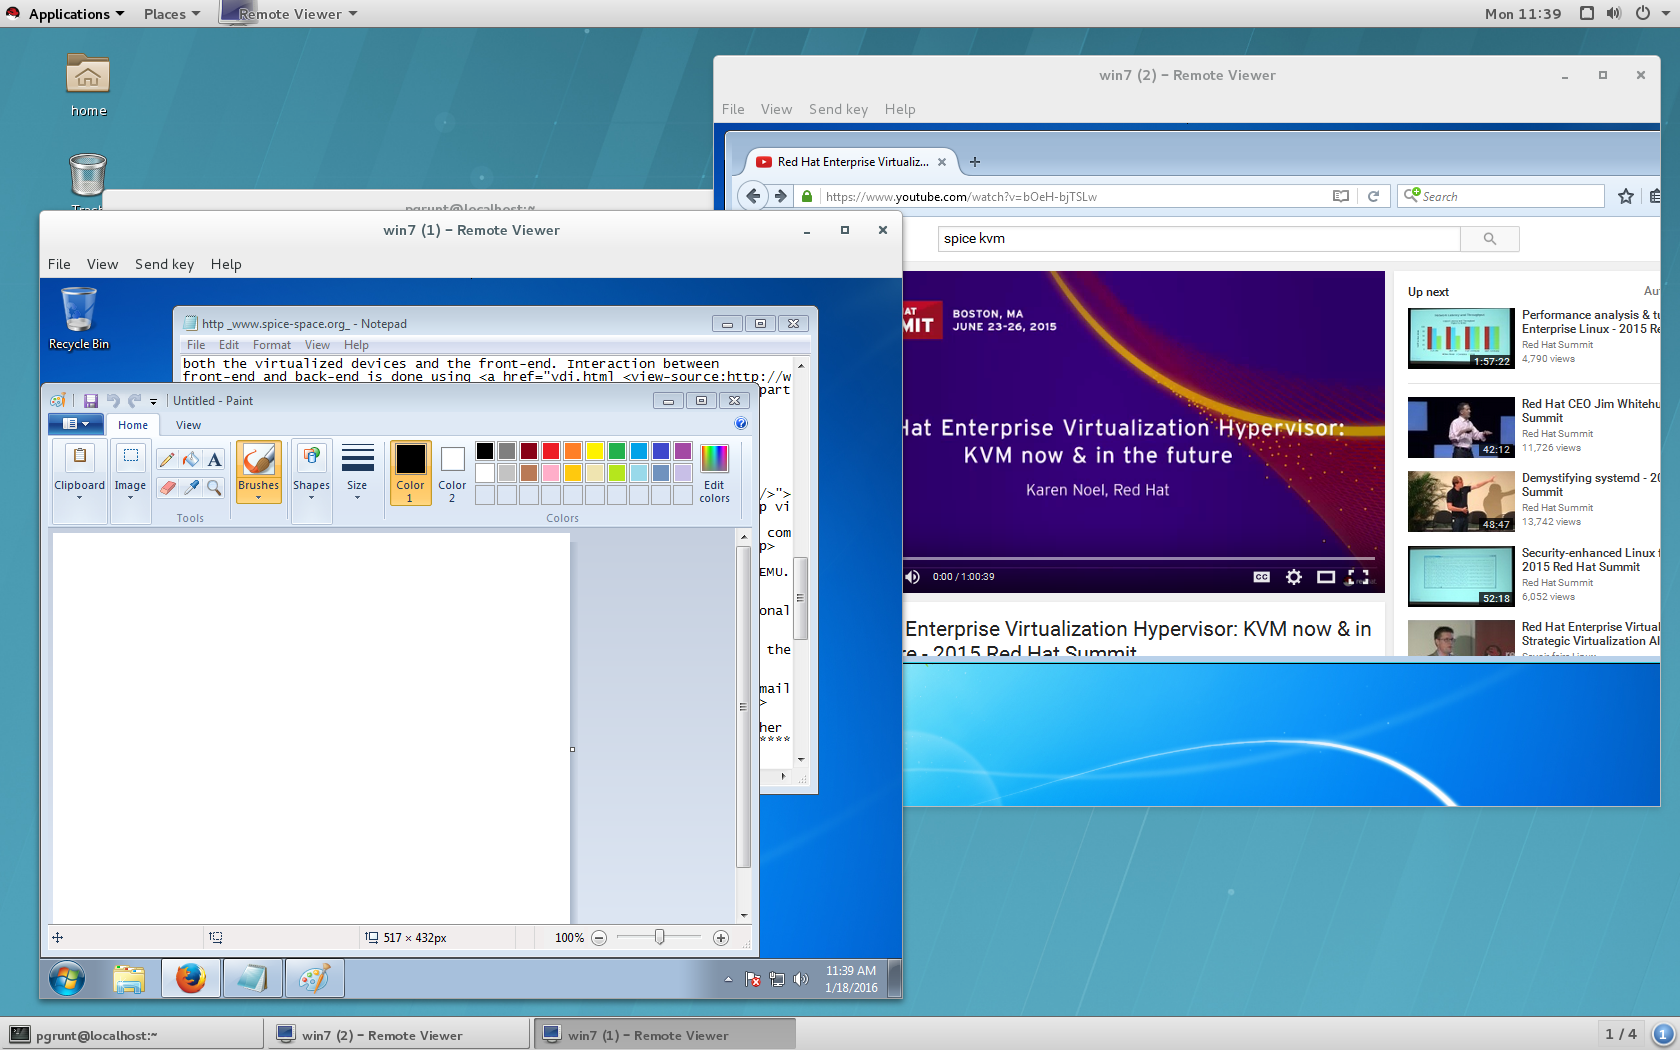
So the solution: The SPICE project aims to provide a complete open-source solution for remote access to virtual machines in a seamless way so you can play videos, record audio, share USB devices, and share folders without complications.


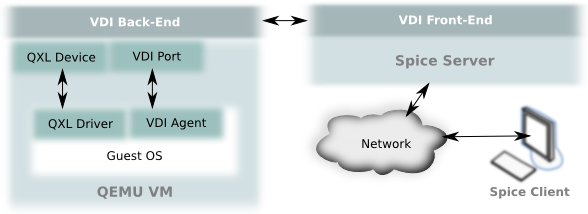
SPICE could be divided into 4 different components: Protocol, Client, Server, and Guest. The protocol is the specification in the communication of the three other components; A client such as a remote viewer is responsible to send data and translate the data from the Virtual Machine (VM) so you can interact with it; The SPICE server is the library used by the hypervisor in order to share the VM under SPICE protocol; And finally, the Guest side is all the software that must be running in the VM in order to make SPICE fully functional, such as the QXL driver and SPICE VDAgent.


Just put in your virtual machine a channel spice and install the driver, the latest version could be found here.

Tuesday, May 21, 2019

How to Boot into Single User Mode in CentOS/RHEL 7

DISCLAIMER: This is not my post is only a copy, in case the original gets deleted or whatever, posting on my personal blog gets easier for me to find it. You can find the original one at this link https://vpsie.com/knowledge-base/boot-single-user-mode-centos-rhel-vpsie/

The first thing to do is to open Terminal and log in to your CentOS 7 server.

After, restarting your server wait for the GRUB boot menu to show.

The next step is to select your Kernel version and press

e

key to edit the first boot option. Find the kernel line (starts with “linux16“), then change the

ro

to

rw init=/sysroot/bin/sh .

When you have finished, press

Ctrl-X

or

F10

to boot into single-user mode

After mounting the root filesystem using the following command:

chroot /sysroot/

Now, to finish this process reboot your server using the following command:

reboot -f

Wednesday, April 17, 2019

XFS online resize

 You're working on an XFS filesystem, in this case, you need to use xfs_growfs instead of resize2fs. Two commands are needed to perform this task :

# growpart /dev/sda 1

growpart is used to expand the sda1 partition to the whole sda disk.

# xfs_growfs -d /dev/sda1

xfs_growfs is used to resize and apply the changes.

# df -h

Monday, July 16, 2018

Change password to users on qcow2 disk or images

Sometimes you need to change the password to a user in a qcow2 image, to test locally, or if you are using an infrastructure without cloud-init, regardless of the user the procedure is the same.

Depending on the system the packages name could change a little, I'm using Fedora 27 I have installed

[alvaro@lykan 2post]$ sudo dnf install libguestfs libguestfs-tools openssl
Last metadata expiration check: 1:53:31 ago on Mon 16 Jul 2018 01:51:05 PM CDT.
Package libguestfs-1:1.38.2-1.fc27.x86_64 is already installed, skipping.
Package libguestfs-tools-1:1.38.2-1.fc27.noarch is already installed, skipping.
Package openssl-1:1.1.0h-3.fc27.x86_64 is already installed, skipping.
Dependencies resolved.
Nothing to do.
Complete!


Obviously, I have a QEMU environment to test and run the images, a very important part just to know that your steps are working.

[alvaro@lykan 2post]$ guestfish --rw -a ../../Downloads/CentOS-7-x86_64-GenericCloud-1805.qcow2

Welcome to guestfish, the guest filesystem shell for
editing virtual machine filesystems and disk images.

Type: ‘help’ for help on commands
‘man’ to read the manual
‘quit’ to quit the shell

><.fs> run
100% ⟦▒▒▒▒▒▒▒▒▒▒▒▒▒▒▒▒▒▒▒▒▒▒▒▒▒▒▒▒▒▒▒▒▒▒▒▒▒▒▒▒▒▒⟧ 00:00
><.fs> list-filesystems
/dev/sda1: xfs
><.fs> mount /dev/sda1 /
><.fs> cp /etc/shadow /etc/shadow-original
><.fs> vi /etc/shadow


Inside the vim editor, you will see the file and now you can change the hash of any user (do not close this until you reached the last step), in any other terminal run:

[alvaro@lykan 2post]$ openssl passwd -1 mysuperpassword
$1$GKdzYMMe$q20PpMv5i/QFbmgwOqtZy1


Copy that generated hash and copy inside the first and second colon punctuation symbol (delete every inside this)


Before

root:!!:17687:0:99999:7:::
bin:*:17632:0:99999:7:::
daemon:*:17632:0:99999:7:::
adm:*:17632:0:99999:7:::
lp:*:17632:0:99999:7:::
sync:*:17632:0:99999:7:::
shutdown:*:17632:0:99999:7:::
halt:*:17632:0:99999:7:::
mail:*:17632:0:99999:7:::
operator:*:17632:0:99999:7:::
games:*:17632:0:99999:7:::
ftp:*:17632:0:99999:7:::
nobody:*:17632:0:99999:7:::
systemd-network:!!:17687::::::
dbus:!!:17687::::::
polkitd:!!:17687::::::
rpc:!!:17687:0:99999:7:::
rpcuser:!!:17687::::::
nfsnobody:!!:17687::::::
sshd:!!:17687::::::
postfix:!!:17687::::::
chrony:!!:17687::::::


After

root:$1$GKdzYMMe$q20PpMv5i/QFbmgwOqtZy1:17687:0:99999:7:::
bin:*:17632:0:99999:7:::
daemon:*:17632:0:99999:7:::
adm:*:17632:0:99999:7:::
lp:*:17632:0:99999:7:::
sync:*:17632:0:99999:7:::
shutdown:*:17632:0:99999:7:::
halt:*:17632:0:99999:7:::
mail:*:17632:0:99999:7:::
operator:*:17632:0:99999:7:::
games:*:17632:0:99999:7:::
ftp:*:17632:0:99999:7:::
nobody:*:17632:0:99999:7:::
systemd-network:!!:17687::::::
dbus:!!:17687::::::
polkitd:!!:17687::::::
rpc:!!:17687:0:99999:7:::
rpcuser:!!:17687::::::
nfsnobody:!!:17687::::::
sshd:!!:17687::::::
postfix:!!:17687::::::
chrony:!!:17687::::::


Close the vim editor, save the changes, and exit guestfish

><.fs> quit

[alvaro@lykan 2post]$


Now you can test the image on any cloud environment or using your local QEMU environment.

Wednesday, June 14, 2017

Ceph recovery backfilling affecting production instances

In any kind of distributed system, you will have to choose between consistency, availability, and partitioning, the CAP theorem states that in the presence of a network partition, one has to choose between consistency and availability, by default (default configurations) CEPH provides consistency and partitioning, just take in count that CEPH has many config options: ~860 in hammer, ~1100 in jewel, check this out, is jewel github config_opts.h file.

If you want any specific behavior in your cluster depends on your ability to configure and/or to change on the fly in case of contingency, this post talks about specific default recovery / backfilling option clusters, maybe you have noticed that in case of a critical failure, like losing a complete node, this causes a lot of movement of data, lots of ops on the drives, by default the cluster is going to try to recover in the fastest way possible, and also needs to support the normal operation and common use, like I said at the beginning of the post, by default CEPH have consistency and partitioning, so the common response is to start to have failures in the availability and users will start to notice high latency, high CPU usage in instances using RBD backend because of the slow response.


Try to think of this in a better way and let's analyze the problem, if we have a replica 3 cluster and we have a server down (even if we have a 3 servers cluster), the operation is still possible and the recovery jobs are no that important because CEPH will try to achieve consistency all the time, it will achieve the correct 3 replica consistency eventually, so everything will be fine, no data loss, the remaining replicas will start to regenerate the missing replica in others nodes, the big problem is the backfilling will compromise the operation, so the real problem is that we need to choose between a quick recovery or a common response to the clients and watchers connected, the response is not that hard to know, operation response is priority number 0!!!!


Lost and recovery action in CRUSH (Image from Samuel Just, Vault 2015)

This is not the non-plus ultra solution, is just my solution to this problem, all this was tested in a CEPH hammer cluster:

1.- The better one is to configure at the beginning of the installation in the ceph.conf file

******* SNIP *******
[osd]
....
osd max backfills = 1
osd recovery threads = 1
osd recovery op priority = 1
osd client op priority = 63
osd recovery max active = 1
osd snap trim sleep = 0.1
....
******* SNIP *******

2.- If not, you can inject the on-the-fly options, you can use osd.x where x is the number of the osd daemon, or like the next example applies cluster-wide, but remember to put in the config file after because these options will be lost on reboot.

ceph@stor01:~$ sudo ceph tell osd.* injectargs '--osd-max-backfills 1'
ceph@stor01:~$ sudo ceph tell osd.* injectargs '--osd-recovery-threads 1'
ceph@stor01:~$ sudo ceph tell osd.* injectargs '--osd-recovery-op-priority 1'
ceph@stor01:~$ sudo ceph tell osd.* injectargs '--osd-client-op-priority 63'
ceph@stor01:~$ sudo ceph tell osd.* injectargs '--osd-recovery-max-active 1'
ceph@stor01:~$ sudo ceph tell osd.* injectargs '--osd-snap-trim-sleep 0.1'

The final result will be a really slow recovery of the cluster, but operation without any kind of problem.

Wednesday, November 16, 2016

Solve Ceph Clock Skew error

Monitors can be severely affected by significant clock skews across the monitor nodes. This usually translates into weird behavior with no obvious cause. To avoid such issues, you should run a clock synchronization tool on your monitor nodes by default the monitors will allow clocks to drift up to 0.05 seconds.

This error can be seen using:

# ceph -s
# ceph health detail

root@ceph01:~# ceph -s
cluster 9227547b-bb6b-44f7-b877-3f6d25b942a4
health HEALTH_WARN
clock skew detected on mon.ceph01
monmap e3: 3 mons at {ceph01=172.18.3.5:6789/0,ceph02=172.18.5.6:6789/0,ceph03=172.18.5.7:6789/0}
election epoch 24, quorum 0,1,2 ceph01,ceph02,ceph03
mdsmap e17: 1/1/1 up {0=ceph01=up:active}
osdmap e245: 22 osds: 22 up, 22 in
pgmap v14727: 1408 pgs, 5 pools, 11977 MB data, 3183 objects
24729 MB used, 16361 GB / 16385 GB avail
1408 active+clean

The solution? just re-sync the clock in the affected mon, and restart the mon daemon.

root@ceph01:~# service ntp stop
* Stopping NTP server ntpd
root@ceph01:~# ntpdate ntp.ubuntu.com
16 Nov 01:24:16 ntpdate[4149434]: adjust time server 91.189.91.157 offset -0.002235 sec
root@ceph01:~# ntpd -gq
ntpd: time slew +0.003482s
root@ceph01:~# service ntp start
* Starting NTP server ntpd
root@ceph01:~# restart ceph-mon-all
ceph-mon-all start/running

Just to be sure, sometimes it will be better if you sync the clock on all Mon

Also, this default parameter (0.05 seconds) can be changed in the ceph config file, but that you can doesn't mean that you should, the default value is a perfect configuration.

root@ceph01:~# cat /etc/ceph/ceph.conf
....

[mon]
mon clock drift allowed = 10

...

Check again the cluster status, sometimes it takes a few seconds, like 30 seconds.

root@ceph01:~# ceph -s
cluster 9227547b-bb6b-44f7-b877-3f6d25b942a4
health HEALTH_OK
monmap e3: 3 mons at {ceph01=172.18.3.5:6789/0,ceph02=172.18.5.6:6789/0,ceph03=172.18.5.7:6789/0}
election epoch 24, quorum 0,1,2 ceph01,ceph02,ceph03
mdsmap e17: 1/1/1 up {0=ceph01=up:active}
osdmap e245: 22 osds: 22 up, 22 in
pgmap v14727: 1408 pgs, 5 pools, 11977 MB data, 3183 objects
24729 MB used, 16361 GB / 16385 GB avail
1408 active+clean

Cloning a Ceph client auth key

 I don't recall any reason to do this other than using the same user and auth key to authenticate in different Ceph clusters, like in a multi-backend solution, or just because things get messy when you are not using a default configuration.

Sometimes, things get easy when we use the same user and auth key on both clusters for services to connect to, so let's see some background commands for managing users, keys, and permissions:

Create a new user and auth token (cinder client example):

root@ceph-admin:~# ceph auth get-or-create client.jerry
client.jerry
key: AQAZT05WoQuzJxAAX5BKxCbPf93CwihuHo27VQ==

So as you see the key is not a parameter, in a different server this will produce a completely different key.
Just to check, print the complete list of keys:

root@ceph-admin:~# ceph auth list
installed auth entries:

osd.0
key: AQCvCbtToC6MDhAATtuT70Sl+DymPCfDSsyV4w==
caps: [mon] allow profile osd
caps: [osd] allow *
osd.1
key: AQC4CbtTCFJBChAAVq5spj0ff4eHZICxIOVZeA==
caps: [mon] allow profile osd
caps: [osd] allow *
client.admin
key: AQBHCbtT6APDHhAA5W00cBchwkQjh3dkKsyPjw==
caps: [mds] allow
caps: [mon] allow *
caps: [osd] allow *
client.jerry
key: AQAZT05WoQuzJxAAX5BKxCbPf93CwihuHo27VQ==

Or print a user’s authentication key to standard output, execute the command in the following format

ceph auth print-key {TYPE}.{ID}

root@ceph-admin:~# ceph auth print-key client.jerry
AQAZT05WoQuzJxAAX5BKxCbPf93CwihuHo27VQ==

To change this in order to match with others, we need to update their keys and/or their capabilities, the import command is for this, remember their keys and their capabilities will update on existing users and create new ones, use the following format:

ceph auth import -i /path/to/keyring

The keyring file needs to be in this format, if not, the command will not work and the part of the work, it will just hang.

root@ceph-admin:~# cat jerry.key
[client.jerry]
key = AQAMP01WS8i8ERAAPspjwMzUm4SL00n+WppM6A==

Now we can update the auth key for the user jerry:

root@ceph-admin:~# auth import -i ./jerry.key
imported keyring

List again.

root@ceph-admin:~# ceph auth list
installed auth entries:

osd.0
key: AQCvCbtToC6MDhAATtuT70Sl+DymPCfDSsyV4w==
caps: [mon] allow profile osd
caps: [osd] allow *
osd.1
key: AQC4CbtTCFJBChAAVq5spj0ff4eHZICxIOVZeA==
caps: [mon] allow profile osd
caps: [osd] allow *
client.admin
key: AQBHCbtT6APDHhAA5W00cBchwkQjh3dkKsyPjw==
caps: [mds] allow
caps: [mon] allow *
caps: [osd] allow *
client.jerry
key: AQAMP01WS8i8ERAAPspjwMzUm4SL00n+WppM6A==

Done, I will continue posting these little helping tricks until the last post about multi-backend ceph is out.

Friday, March 18, 2016

Export instance from OpenStack with Ceph/rbd backend

Suppose that you want to migrate an instance from different infrastructures or you want to hand over an instance information to a client, so you need to recover (export) the instance volumes information.


Step 1: Get the instance UUID.

root@ceph-admin:~# nova list | grep InstanceToExport | 2bdda36c-f0dd-4fa5-bb8b-3df346b17002 | InstanceToExport | SHUTOFF | - | Shutdown | vlan8=192.168.255.53; vlan1837=10.20.37.7; vlan1829=10.20.23.53 |


UUID from the instance is returned here: 2bdda36c-f0dd-4fa5-bb8b-3df346b17002


Step 2: Get the volume UUID from the instance, using the UUID returned in step 1

root@ceph-admin:~# cinder list | grep 2bdda36c-f0dd-4fa5-bb8b-3df346b17002 | fdb279c5-24bb-45d7-a86a-a33f4c285b5a | in-use | None | 100 | None | true | 2bdda36c-f0dd-4fa5-bb8b-3df346b17002 |


UUID from the volume is returned here: fdb279c5-24bb-45d7-a86a-a33f4c285b5a


Step 3: Search from the volume on the pool in ceph, in my case this volume is stored in the cinder-volumes pool

root@ceph-admin:~# rbd --pool cinder-volumes ls | grep fdb279c5-24bb-45d7-a86a-a33f4c285b5a volume-fdb279c5-24bb-45d7-a86a-a33f4c285b5a


By this time you have the volume name in the pool: volume-fdb279c5-24bb-45d7-a86a-a33f4c285b5a


Step 4: Export the volume.

root@ceph-admin:~# rbd export cinder-volumes/volume-fdb279c5-24bb-45d7-a86a-a33f4c285b5a ./InstanceToExport.img Exporting image: 100% complete...done.
root@ceph-admin:~# ll -ltrh *.img -rw-r--r-- 1 root root 100G Feb 17 17:09 InstanceToExport.img


Step 5: Compress, so you can scp or rsync faster, this step is optional but highly recommended.


root@ceph-admin:~# gzip -9 InstanceToExport.img root@ceph-admin:~# ll *.gz -rw-r--r-- 1 root root 1.2G Feb 17 18:02 InstanceToExport.img.gz


Step 6: Checksum, to be sure that you don't have any problem copying

root@ceph-admin:~# md5sum InstanceToExport.img >InstanceToExport.img.md5 root@ceph-admin:~# md5sum InstanceToExport.img.gz >InstanceToExport.img.gz.md5 root@ceph-admin:~# cat InstanceToExport.img.md5 5504cdf2261556135811fdd5787b33a5 InstanceToExport.img root@ceph-admin:~# cat InstanceToExport.img.gz.md5 8a76c28d404f44cc43872e69c9965cd2 InstanceToExport.img.gz


Note: the md5sum InstanceToExport.img is going to take a lot! in my volume (100G) like 20 minutes, omit it if you want.

Saturday, March 12, 2016

Testing juju environment inside LXC container

I think we pass the part about what juju is and how it works, so I'll post direct commands and configurations of how to get the environment working inside an LXC container, created just for juju, not the local configuration that creates an LXC container, in other words, out host server does not have any juju package.

Some links to read in case you need more info, or you can post a question.

Guest environment:

root@spyder:~# cat /etc/issue Ubuntu 15.10 root@spyder:~# uname -a Linux spyder 4.2.0-18-generic #22-Ubuntu SMP Fri Nov 6 18:25:50 UTC 2015 x86_64 x86_64 x86_64 GNU/Linux root@spyder:~# dpkg-query -W | grep lxc liblxc1 1.1.5-0ubuntu5~ubuntu15.10.1~ppa1 lxc 1.1.5-0ubuntu5~ubuntu15.10.1~ppa1 lxc-templates 2.0.0~beta2-0ubuntu2~ubuntu15.10.1~ppa1 lxcfs 2.0.0~rc3-0ubuntu1~ubuntu15.10.1~ppa1 lxctl 0.3.1+debian-3 python3-lxc 1.1.5-0ubuntu5~ubuntu15.10.1~ppa1


In my host server, I have two lxcbr interfaces, but for the juju container I going to use lxcbr0, the container will have complete internet access but to access internal apps we are going to need DNAT iptables rules (at the end I'll post the iptables configuration).

root@spyder:~# ifconfig lxcbr0 | grep inet inet addr:10.0.2.1 Bcast:0.0.0.0 Mask:255.255.255.0 inet6 addr: fe80::58b8:36ff:fe6e:4e57/64 Scope:Link

Original lxc-ls output

root@spyder:~# lxc-ls --fancy NAME STATE IPV4 IPV6 GROUPS AUTOSTART ------------------------------------------------------------------- ceph-admin RUNNING 10.0.2.11, 10.0.3.84 - - YES ceph01 RUNNING 10.0.2.85, 10.0.3.85 - - YES ceph02 RUNNING 10.0.2.103, 10.0.3.86 - - YES ceph03 RUNNING 10.0.2.156, 10.0.3.87 - - YES


Now to the fun part, getting things working :)

First, create the juju container.

root@spyder:~# lxc-create -t download -n juju -- --dist ubuntu --release trusty --arch amd64 Using image from local cache Unpacking the rootfs --- You just created an Ubuntu container (release=trusty, arch=amd64, variant=default) To enable sshd, run: apt-get install openssh-server For security reason, container images ship without user accounts and without a root password. Use lxc-attach or chroot directly into the rootfs to set a root password or create user accounts.


Start the container


root@spyder:~# lxc-start -n juju -d --logfile juju.log root@spyder:~# lxc-ls --fancy NAME STATE IPV4 IPV6 GROUPS AUTOSTART ------------------------------------------------------------------- ceph-admin RUNNING 10.0.2.11, 10.0.3.84 - - YES ceph01 RUNNING 10.0.2.85, 10.0.3.85 - - YES ceph02 RUNNING 10.0.2.103, 10.0.3.86 - - YES ceph03 RUNNING 10.0.2.156, 10.0.3.87 - - YES juju RUNNING 10.0.2.110 - - YES


Now let's attach to the container (in this part you need to install openssh-server, set passwords to users, etc.)


root@spyder:~# lxc-attach --name juju root@juju:~# ip a 1: lo: mtu 65536 qdisc noqueue state UNKNOWN group default link/loopback 00:00:00:00:00:00 brd 00:00:00:00:00:00 inet 127.0.0.1/8 scope host lo valid_lft forever preferred_lft forever inet6 ::1/128 scope host valid_lft forever preferred_lft forever 22: eth0@if23: mtu 1500 qdisc pfifo_fast state UP group default qlen 1000 link/ether 00:16:3e:53:f1:f5 brd ff:ff:ff:ff:ff:ff inet 10.0.2.110/24 brd 10.0.2.255 scope global eth0 valid_lft forever preferred_lft forever inet6 fe80::216:3eff:fe53:f1f5/64 scope link valid_lft forever preferred_lft forever


To install Juju, you simply need to grab the latest juju-core package from the PPA:


root@juju:~# apt-get install python-software-properties root@juju:~# apt-get install software-properties-common root@juju:~# add-apt-repository ppa:juju/stable Stable release of Juju for Ubuntu 12.04 and above. More info: https://launchpad.net/~juju/+archive/ubuntu/stable Press [ENTER] to continue or ctrl-c to cancel adding it gpg: keyring `/tmp/tmpyqs7twek/secring.gpg' created gpg: keyring `/tmp/tmpyqs7twek/pubring.gpg' created gpg: requesting key C8068B11 from hkp server keyserver.ubuntu.com gpg: /tmp/tmpyqs7twek/trustdb.gpg: trustdb created gpg: key C8068B11: public key "Launchpad Ensemble PPA" imported gpg: Total number processed: 1 gpg: imported: 1 (RSA: 1) OK root@juju:~# apt-get update root@juju:~# apt-get upgrade root@juju:~# apt-get install juju-quickstart juju-core


Juju needs to be configured to use your cloud provider. This is done via the following file:


$HOME/.juju/environments.yaml


Juju can automatically generate the file in this way:


ubuntu@juju:~$ juju generate-config


There are different types of clouds providers, check the environments.yaml for more info, the one important for us is the manual provider because we are going to deploy on manually on our same machine (LXC container in this case), so I deleted all the other information:

ubuntu@juju:~$ cat /home/ubuntu/.juju/environments.yaml default: manual environments: manual: type: manual # bootstrap-host holds the host name of the machine where the # bootstrap machine agent will be started. bootstrap-host: juju # bootstrap-user specifies the user to authenticate as when # connecting to the bootstrap machine. It defaults to # the current user. bootstrap-user: ubuntu # storage-listen-ip specifies the IP address that the # bootstrap machine's Juju storage server will listen # on. By default, storage will be served on all # network interfaces. # storage-listen-ip: # storage-port specifes the TCP port that the # bootstrap machine's Juju storage server will listen # on. It defaults to 8040 # storage-port: 8040 # Whether or not to refresh the list of available updates for an # OS. The default option of true is recommended for use in # production systems. # # enable-os-refresh-update: true # Whether or not to perform OS upgrades when machines are # provisioned. The default option of false is set so that Juju # does not subsume any other way the system might be # maintained. # # enable-os-upgrade: false


The first step is to create a bootstrap environment. This is a cloud instance that Juju will use to deploy and manage services. It will be created according to the configuration you have provided, and your public SSH key will be uploaded automatically so that Juju can communicate securely with the bootstrap instance.


ubuntu@juju:~$ juju switch manual manual -> manual ubuntu@juju:~$ juju bootstrap WARNING ignoring environments.yaml: using bootstrap config in file "/home/ubuntu/.juju/environments/manual.jenv" Bootstrapping environment "manual" Starting new instance for initial state server Installing Juju agent on bootstrap instance Logging to /var/log/cloud-init-output.log on remote host Running apt-get update Installing package: curl Installing package: cpu-checker Installing package: bridge-utils Installing package: rsyslog-gnutls Installing package: cloud-utils Installing package: cloud-image-utils Installing package: tmux Fetching tools: curl -sSfw 'tools from %{url_effective} downloaded: HTTP %{http_code}; time %{time_total}s; size %{size_download} bytes; speed %{speed_download} bytes/s ' --retry 10 -o $bin/tools. tar.gz Bootstrapping Juju machine agent Starting Juju machine agent (jujud-machine-0) Bootstrap agent installed manual -> manual Waiting for API to become available Waiting for API to become available Bootstrap complete


You can see that the bridge-utils package is installed, but inside an lxc container you are not going to use it and it can pass through an outside bridge to the juju container


root@juju:~# apt-get purge bridge-utils


If you have any problem on the bootstrap delete conf files and start over, and I mean problems like the nasty “ERROR machine is already provisioned” when the machine is not really provisioned.


root@juju:~# apt-get purge lxc* root@juju:~# apt-get purge juju* root@juju:~# rm -rf /etc/init/juju* root@juju:~# rm -rf /var/lib/juju


If not, just continue, if everything is well right, you will see an output similar to this one, this means that the juju service is running on machine 0 (same LXC container).


ubuntu@juju:~$ juju status environment: manual machines: "0": agent-state: started agent-version: 1.25.3 dns-name: juju instance-id: 'manual:' series: trusty hardware: arch=amd64 cpu-cores=2 mem=3000M state-server-member-status: has-vote services: {}


Assuming it returns successfully, we can now deploy some services and explore the basic operations of Juju, next, you simply need to deploy our first charm (juju-gui) and expose it, this charm makes it easy to deploy a Juju GUI into an existing environment.


ubuntu@juju:~$ juju deploy juju-gui --to 0
ubuntu@juju:~$ juju expose juju-gui
........
........ after a couple of minutes, juju needs to download several packages and configure all, so better use "watch juju status", untill you see and output similar to this.
........
ubuntu@juju:~$ juju status
environment: manual
machines:
  "0":
    agent-state: started
    agent-version: 1.25.3
    dns-name: juju
    instance-id: 'manual:'
    series: trusty
    hardware: arch=amd64 cpu-cores=2 mem=3000M
    state-server-member-status: has-vote
services:
  juju-gui:
    charm: cs:trusty/juju-gui-51
    exposed: true
    service-status:
      current: unknown
      since: 12 Mar 2016 09:12:45Z
    units:
      juju-gui/0:
        workload-status:
          current: unknown
          since: 12 Mar 2016 09:12:45Z
        agent-status:
          current: idle
          since: 12 Mar 2016 09:17:48Z
          version: 1.25.3
        agent-state: started
        agent-version: 1.25.3
        machine: "0"
        open-ports:
        - 80/tcp
        - 443/tcp
        public-address: juju


Now the juju-gui is installed, configured, and exposed over ports 80 and 443, but remember, this is inside the LXC container, so we can't access the GUI unless we NAT some ports from our host server.


root@spyder:~# iptables -t nat -A PREROUTING -p tcp -d 10.0.1.139 --dport 443 -j DNAT --to-destination 10.0.2.110:443 root@spyder:~# iptables -t nat -A PREROUTING -p tcp -d 10.0.1.139 --dport 80 -j DNAT --to-destination 10.0.2.110:80


And boom!!!! now we can access juju-gui, the login info is on this file:


ubuntu@juju:~$ cat .juju/environments/manual.jenv user: admin password: 0d4e465c15d5880d0c348a921489a9f1 .......
Thursday, March 10, 2016

Cinder Volume Transfer

Let's assume you want to change ownership of volume from Tenant_A to Tenant_B.

Step 1: Tenant A will initiate an Ownership Transfer which will enable another tenant to take ownership of it.

$ source openrc Tenant_A Tenant_A $ cinder transfer-create [volume_id]

An Authentication Key and a Transfer ID are returned here.

Step 2: Tenant B needs to accept the Transfer using the Transfer ID and The Authentication Key generated above.

$ source openrc Tenant_B Tenant_B $ cinder transfer-accept [transfer_id] [auth_key]

You should now see that volume associated with Tenant_B

Thursday, March 12, 2015

The real problem behind highly transactional applications

An architecture trying to respond to at least 10000 concurrent connections per second, is trying to solve the C10K problem, even if this is so last decade is still breaking servers, architectures, and configurations, giving sysadmins real headaches and not always because of real connections, also for basic DDoS attacks (pretty much is the same concept: lots and lots of new connections to the same service).

Today, because of the need of connecting and sharing resources across infrastructures and also the need to implement high availability in solutions many companies have implemented SOA or multi-layer solutions when these solutions can become handy, it could also be a problem if are not implemented in the correct way: without the proper testing set, and sometimes people don't even know it if the architecture implemented is going to respond in the correct way or even the way that the developers team are planning. this problem does not only affect to wrong configured architectures but also solutions not properly planned to grow.

The problem usually is errors in coding and validation on every layer of the application solution; proprietary code, web server, application server, DBMS, and so on, if applications were coded properly security and bug-hunting guys would be unemployed by now.

So what are you going to see in a highly transactional server with a misconfiguration problem?

  • Lots of TIME_WAIT connections.
  • Lots of CLOSE_WAIT connections.
  • Possibly memory problems.
  • Possibly the system swapping.
  • Really Slow server.
  • Many timeouts in the application log.
  • The application became unreachable.
  • We can't create new connections to the server, even ssh ones.
  • ... Worst case scenario, dead servers.

But service restart, reboot and kill will not solve all the problems, nor the operating system or the kernel are there to solve all the problems, the kernel work is to handle the control plane and in a general and multipurpose way, if you take only the kernel tuning approach, the kernel is going to be part of the problem, and you are going to be far far away to solve the problem.

The kernel has a known way to work and knows O(n^2) complexity, with every new connection the kernel has to walk down all the current processes to figure out which thread should handle the packet or if we talk of connection polls the process is the same, each packet had to walk a list of sockets.


Hight level Kernel diagram: layers and intercommunication (1).


Even if you take the complete tuning approach, maybe the application is going to work, but not always, you only are going to get stability, but not the real solution, the correct way to handle and solve the C10K problem, even more, C10M is letting the kernel solve de control plane and applications handle the data plane and/or write software to bypass the stack, such as DPDK (2), this is pretty much like if we're talking about an exokernel (3), using an end-to-end principle.


Common Kernel V/S ExoKernel (3).


To build usable and scalable applications to support 10 million concurrent connections per second (and more), we need to solve other kinds of problems first.

  • Packet scalability.
  • Multi-core scalability.
  • Memory scalability.

So the real problem is.... knowledge, lots of developers know how to code client/server applications, but less than 50% of them know how the TCP/IP or TTCP/IP works, and how to use MP libraries, I understand this is not an easy task to accomplish, but we really need to start working on that, with every performance problem we also need to start looking in the code and software architecture searching for scalability errors, not always will have site reliability engineers to help our application to be super reliable, super fast, all the time, even if we have these guys to help us, the solution can be found many iterations behind before the system starts losing points of our precious 99.99…99

And what if, we can correct coding errors fast enough or we can’t (in the case of proprietary software): tuning, will always be the answer, but like I said, tune all the layers, not only the kernel:

  • Tune for aggressive network throughput.
  • Tune timeouts.
  • Tune the socket parameters.
  • Tune shared filesystems.
  • Tune the schedulers.
  • Tune the complete architecture.
  • ….

There are many layers before can reach the kernel, and even if you want to tune the kernel you need to understand how the application works, communicate and use internal and external applications, libraries, and utilities.


Common multi-layer software architecture (4).


In common transactional architectures, tuning will work like a tourniquet in a bullet wounded, probably saving a life but In highly transactional applications, tuning is just to help the system, not to solve problems and your application will die slowly and painfully.

References:

  1. https://en.wikipedia.org/wiki/Monolithic_kernel
  2. http://dpdk.org/
  3. https://en.wikipedia.org/wiki/Exokernel
  4. http://www.guidanceshare.com

Wednesday, October 15, 2014

Why companies should embrace OSS and the DevOps movement

It’s not a secret that the best and most competitive technologies today exist in the world are based on some Open Source component, maybe the Linux kernel, GNU/Linux operating system, a version of BSD, modules, drivers, or the programming language is completely free or have a free compiler or interpreter.

On the other hand, we have a complex and extensive range of solutions that are born almost with every blink, we need options to integrate these solutions into existing technologies, we have to interconnect new software with hardware and almost all possible combinations can generate with these, so basically, no matter what kind of hardware or software want or have to work, if we want to survive in the era of cloud solutions, build an interface to interconnect them will always be the fastest solution, we will always have to be interconnected and this is a main principle that in cloud architectures is required to satisfy, where the hardware is defined by software and everything is “as a Service” (XaaS), everything has to be able to be interconnected with something else, in short, this is the Application Programming Interfaces (API) age.

Nowadays technologies are needed with API (RESTSOAP), communities (RedditIRC, …) accessible information (Blogs, Wikis), otherwise we have to be able to build there, the faster way possible, we need tools, and languages, plugins, everything that we can use to build these interconnections and better solutions, the only platform we can use to accomplish this with the speed needed is the Open Source, it’s not a mystery that Open Source technologies based move much faster than any other kind of proprietary technologies, so if we don’t want to be a technological dinosaur from one day to another we have to know about agile development languages (pythonrubygroovy, …), collaborative work applications (gitlabgithubtracbugzilla, …), source code management and revision control (gitsvn, …), tools that move and help us with the speed required to build new products, today knowing about Open Source, licenses, programming languages, communities is no longer an option.

Speed is not the only thing that Open Source gives, for any professional, having software freedom without limits, whether that solves the problem 100% or having a piece of software that delivers a solid foundation in order to modify and make what is required, POCs without asking for a copy of the software to a company is priceless, which also has an impact on the number of users downloading the same software, which can modify, test, add new characteristics.

I don’t want to expose a vision where nothing else exists besides the Open Source Software but to compete technologically we have to know the ecosystem or even better to innovate must know the tools and work with the right people for the job, people who can integrate all kinds of solutions, but who are this guys? These guys are like super-sysadmins + developers + Open Source gurus, all this and more, equals DevOps engineers (like me), better check this post by the puppetlabs people maybe in the future I’ll write my own.

But you don’t need to believe me, I can challenge you to find a job offer in a company that wants to innovate (any real IT company), regardless of the language or the country you are not looking for DevOps guys or Open Source knowledge.

Let’s cut to the chase, any company that wants to innovate technologically needs DevOps in its payroll, and any DevOps who wants to have a decent job requires Open Source knowledge.

Hope you enjoyed the reading, see you soon!!!
$ commit

Monday, October 8, 2012

Free EL YUM Repositories

If you are using some flavor of Enterprise Linux, eventually will get tired of downloading rpm packages from Here BTW, this is a really great page when you don't have access to FTP services (damn telecom/security guys). And eventually, you will need to have repositories on your server to solve the dependencies. Here are some free repositories provided by Oracle for FREE, but of course, with NO SUPPORT.

OEL 4/RHEL 4, Update 6 or Newer
# cd /etc/yum.repos.d
# wget http://public-yum.oracle.com/public-yum-el4.repo


OEL 5/RHEL 5
# cd /etc/yum.repos.d
# wget http://public-yum.oracle.com/public-yum-el5.repo


OEL 6/RHEL 6
# cd /etc/yum.repos.d
# wget http://public-yum.oracle.com/public-yum-ol6.repo


Oracle VM 2
# cd /etc/yum.repos.d
# wget http://public-yum.oracle.com/public-yum-ovm2.repo


After downloading the repo file, you should set the correct version of your Linux, enabling the "enabled" variable.


[root@openstack yum.repos.d]# cat /etc/yum.repos.d/public-yum-ol6.repo
[ol6_latest]
name=Oracle Linux $releasever Latest ($basearch)
baseurl=http://public-yum.oracle.com/repo/OracleLinux/OL6/latest/$basearch/
gpgkey=http://public-yum.oracle.com/RPM-GPG-KEY-oracle-ol6
gpgcheck=1
enabled=1


And of course, the EPEL repositories. Surf looking for your correct version here EPEL Repository and install the rpm, like this one:


[root@openstack yum.repos.d]# cat /etc/redhat-release
Red Hat Enterprise Linux Server release 6.2 (Santiago)
[root@openstack ~]# rpm -Uvh http://fedora.mirror.nexicom.net/epel/6/x86_64/epel-release-6-7.noarch.rpm
Retrieving http://fedora.mirror.nexicom.net/epel//6/x86_64/epel-release-6-7.noarch.rpm
warning: /var/tmp/rpm-tmp.h0G5aN: Header V3 RSA/SHA256 Signature, key ID 0608b895: NOKEY
Preparing...                ########################################### [100%]
   1:epel-release           ########################################### [100%]
[root@openstack ~]# ll /etc/yum.repos.d/
total 8
-rw-r--r--. 1 root root  957 May  9 10:55 epel.repo
-rw-r--r--. 1 root root 1056 May  9 10:55 epel-testing.repo

Tuesday, April 24, 2012

SSH login without password

Suppose you want to use Linux and OpenSSH to automize your tasks or you just don't want to type the password every time you connect to a server.


You can solve this issue by doing this.

Scenario:
skyline wants to connect to veyron using ssh without a password.

By default, the ssh command has the order to check for authentication: Authentications that can continue: publickey,gssapi-keyex,gssapi-with-mic,password

[0] skyline ~ $ ssh alvaro@veyron -v OpenSSH_5.3p1, OpenSSL 1.0.0-fips 29 Mar 2010 debug1: Reading configuration data /etc/ssh/ssh_config debug1: Applying options for * debug1: Connecting to veyron[10.10.1.194] port 22. debug1: Connection established. debug1: permanently_set_uid: 0/0 debug1: identity file /Users/alvaro/.ssh/identity type -1 debug1: identity file /Users/alvaro/.ssh/id_rsa type 1 debug1: identity file /Users/alvaro/.ssh/id_dsa type -1 debug1: Remote protocol version 2.0, remote software version OpenSSH_5.3 debug1: match: OpenSSH_5.3 pat OpenSSH* debug1: Enabling compatibility mode for protocol 2.0 debug1: Local version string SSH-2.0-OpenSSH_5.3 debug1: SSH2_MSG_KEXINIT sent debug1: SSH2_MSG_KEXINIT received debug1: kex: server->client aes128-ctr hmac-md5 none debug1: kex: client->server aes128-ctr hmac-md5 none debug1: SSH2_MSG_KEX_DH_GEX_REQUEST(1024 debug1: Authentications that can continue: publickey,gssapi-keyex,gssapi-with-mic,password debug1: Next authentication method: gssapi-keyex debug1: No valid Key exchange context debug1: Next authentication method: gssapi-with-mic debug1: Unspecified GSS failure. Minor code may provide more information Credentials cache file '/tmp/krb5cc_0' not found debug1: Unspecified GSS failure. Minor code may provide more information Credentials cache file '/tmp/krb5cc_0' not found debug1: Unspecified GSS failure. Minor code may provide more information debug1: Unspecified GSS failure. Minor code may provide more information debug1: Next authentication method: publickey debug1: Trying private key: /Users/alvaro/.ssh/identity debug1: Offering public key: /Users/alvaro/.ssh/id_rsa debug1: Authentications that can continue: publickey,gssapi-keyex,gssapi-with-mic,password debug1: Trying private key: /Users/alvaro/.ssh/id_dsa debug1: Next authentication method: password alvaro@veyron's password:

Checking the ssh server authorized_keys configuration:

root # grep -e Authorized -e Pubkey /etc/ssh/sshd_config | grep -v '#' PubkeyAuthentication yes AuthorizedKeysFile .ssh/authorized_keys

Generating public/private rsa key pair:

[0] skyline ~ $ ssh-keygen -t rsa
Generating public/private rsa key pair.
Enter file in which to save the key (/Users/alvaro/.ssh/id_rsa): 
Created directory '/Users/alvaro/.ssh'.
Enter passphrase (empty for no passphrase): 
Enter same passphrase again: 
Your identification has been saved in /Users/alvaro/.ssh/id_rsa.
Your public key has been saved in /Users/alvaro/.ssh/id_rsa.pub.
The key fingerprint is:
53:1d:8a:f8:93:a8:1e:e2:9d:db:f8:ca:3d:73:5a:60 alvaro@skyline
The key's randomart image is:
+--[ RSA 2048]----+
|            .    |
|       . . o .   |
|      . . o .    |
|       o o       |
|      E S        |
|     o . o       |
|  . o   .        |
| . = *o..        |
|  . O+==         |
+-----------------+
[0] skyline ~ $ ssh alvaro@veyron mkdir -p .ssh 
Password: 
[0] skyline ~ $ cat .ssh/id_rsa.pub | ssh alvaro@veyron 'cat >> .ssh/authorized_keys'
Password: 
[0] skyline ~ $ cat .ssh/config 
Host veyron
    User alvaro
    Hostname 10.10.1.194

Verbose connection:

[0] skyline ~ $ ssh alvaro@veyron -v OpenSSH_5.3p1, OpenSSL 1.0.0-fips 29 Mar 2010 debug1: Reading configuration data /etc/ssh/ssh_config debug1: Applying options for * debug1: Connecting to localhost [::1] port 22. debug1: Connection established. debug1: permanently_set_uid: 0/0 debug1: identity file /Users/alvaro/.ssh/identity type -1 debug1: identity file /Users/alvaro/.ssh/id_rsa type 1 debug1: identity file /Users/alvaro/.ssh/id_dsa type -1 debug1: Remote protocol version 2.0, remote software version OpenSSH_5.3 debug1: match: OpenSSH_5.3 pat OpenSSH* debug1: Enabling compatibility mode for protocol 2.0 debug1: Local version string SSH-2.0-OpenSSH_5.3 debug1: SSH2_MSG_KEXINIT sent debug1: SSH2_MSG_KEXINIT received debug1: kex: server->client aes128-ctr hmac-md5 none debug1: kex: client->server aes128-ctr hmac-md5 none debug1: SSH2_MSG_KEX_DH_GEX_REQUEST(1024 debug1: Authentications that can continue: publickey,gssapi-keyex,gssapi-with-mic,password debug1: Next authentication method: gssapi-keyex debug1: No valid Key exchange context debug1: Next authentication method: gssapi-with-mic debug1: Unspecified GSS failure. Minor code may provide more information Credentials cache file '/tmp/krb5cc_0' not found debug1: Unspecified GSS failure. Minor code may provide more information Credentials cache file '/tmp/krb5cc_0' not found debug1: Unspecified GSS failure. Minor code may provide more information debug1: Unspecified GSS failure. Minor code may provide more information debug1: Next authentication method: publickey debug1: Trying private key: /Users/alvaro/.ssh/identity debug1: Offering public key: /Users/alvaro/.ssh/id_rsa debug1: Server accepts key: pkalg ssh-rsa blen 277 debug1: read PEM private key done: type RSA debug1: Authentication succeeded (publickey). debug1: channel 0: new [client-session] debug1: Requesting no-more-sessions@openssh.com debug1: Entering interactive session. debug1: Sending environment. debug1: Sending env LANG = en_US.UTF-8 Last login: Tue Apr 24 14:50:42 CDT 2012 from skyline.headup.ws on ssh alvaro@veyron ~ $

Clean ssh execution:

[0] skyline ~ $ ssh veyron Last login: Tue Apr 24 14:50:42 CDT 2012 from skyline.headup.ws on ssh alvaro@veyron ~ $